
C# Testing Basics
Hello! This is a short introduction on how to test your C# code. This is primarily intended for SUP students at EPITA, who want to go further with their TPs.
I’m in a rush!
If you do not care about the context behind testing and just want to write tests, you can directly go to the first three sections of C# testing with NUnit.
Why?
You are already testing your code using your Main function. Why change?
There are a few reasons for this. The main ones I see for you are:
- Automation. You don’t have to squint to check your results anymore, let other programs do that for you.
- Better organisation. Instead of dumping everything inside a fat function, you will instead have clean separations between your tests, for extra legibility. You will also be able to run and debug tests separately.
Well-designed tests will give you a visual report of “is my thing working”.
Here’s an example of a test-suite (a collection of tests) on the EpiLink project:
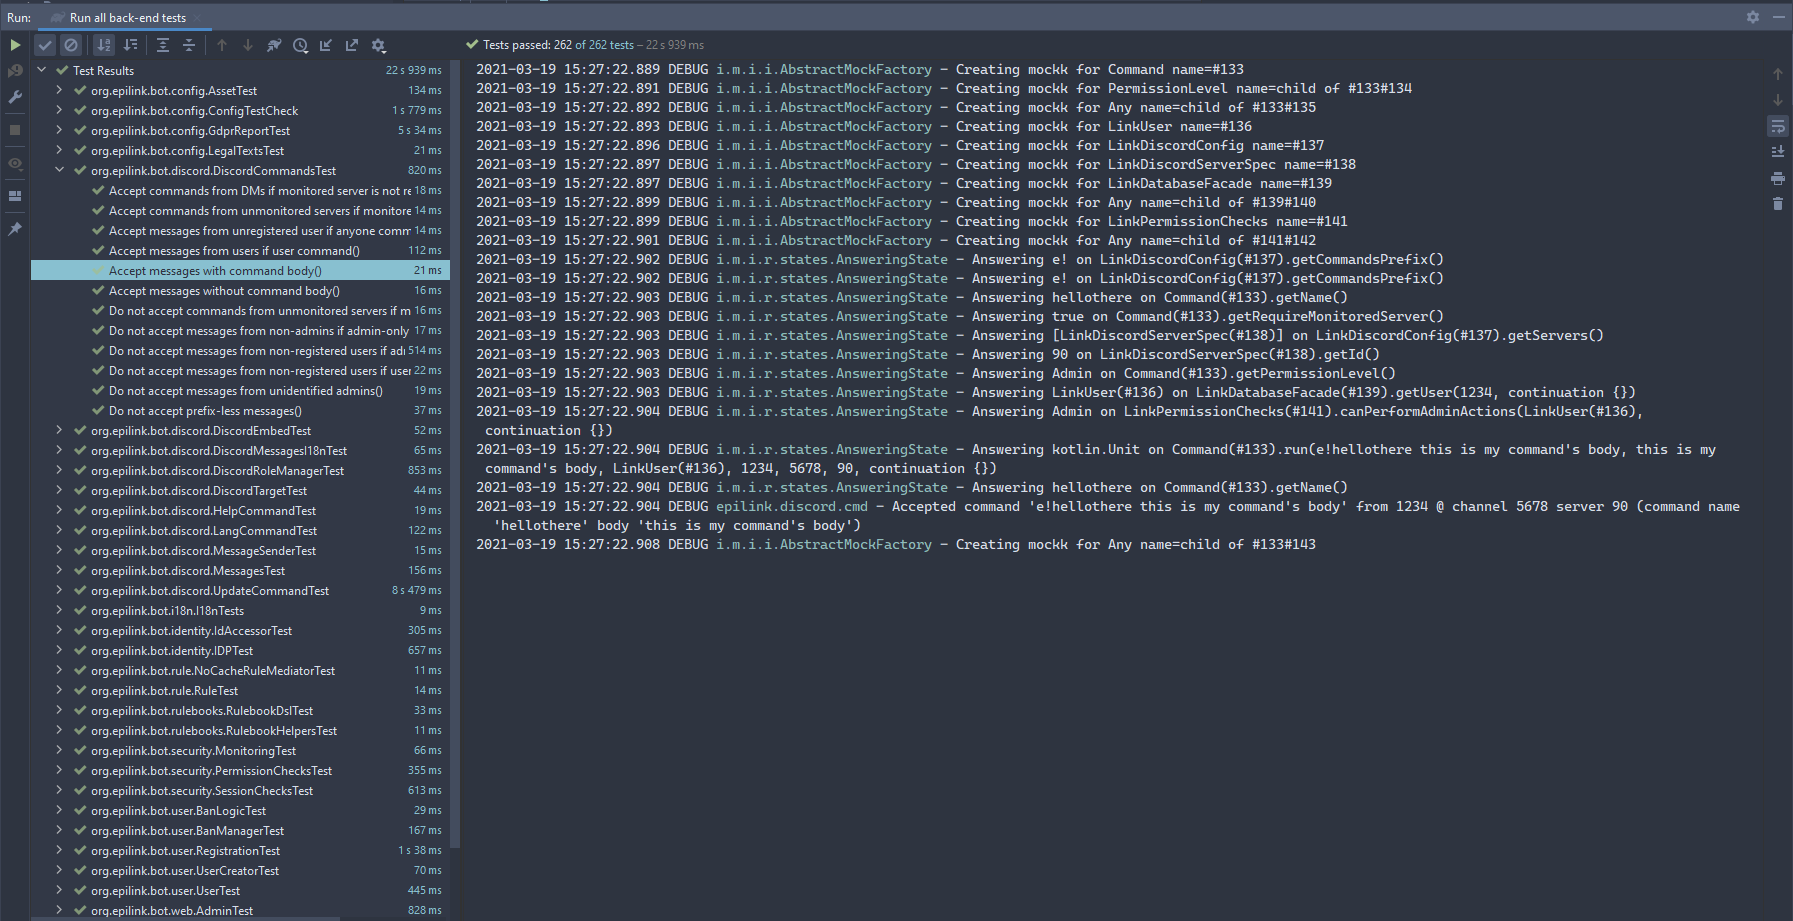
Your IDE is able to provide insight on which tests failed.
Testing 101
There are many kinds of testing. Let’s say we are making a calculator program, like so:
$ ./mycalc "1+2"
3
There are multiple ways of testing this program:
-
Functional testing: testing the end results of your program. With our example, this means launching our program with
1+2as an argument and checking that it prints 3. This is a “black box” kind of testing: we test the entire program, not its individual parts. We do not care about what’s inside of it, just that it works properly from the outside. -
Integration testing: you will not be using this until your 4th/5th year at EPITA. This consists in taking two distinct part of your programs (e.g. two “services”) and checking that the glue you made to make them interact works well. In our example, this could be checking that a parsing service and execution service work well together, should they be separated.
-
Unit testing: what we are interested in. This is the “lowest level”, as we are directly testing functions and classes in our code (i.e. this is not black box testing, we need to know what is inside our program)
All of the tests have different uses and are useful for different things. For C# TPs, unit testing is the best thing you can do.
Unit tests consist in three parts, sometimes called “Arrange, Act, Assert”, although there are other expressions for this:
- Given a situation (Arrange)
- When I do X (Act)
- I should get Y (Assert)
Depending on how you decide to structure your test code, these three parts will not always be visible, especially for simple tests. When it does appear, the structure will look like this:
// Given
SomeObject obj = ...;
obj.SetSomething(...);

// When I do
SomeResult result = obj.SomethingITest();

// I should get

// your checks on "result" here
Complex tests should naturally have this structure, as it makes tests easier to understand and more readable.
C# testing with NUnit
For this article, we will be using NUnit as our testing framework. This just means that NUnit will be responsible of running our tests and providing methods for checking our code’s results.
Project
In order to test your code, you will need a separate unit test project next to the project that contains the code you want to test. There are a bunch of reasons for this:
- You do not want your clients to have additional tests with the code you give them: you should have tested your code in advanced, and shipping test code with your regular code means additional bloat.
- Test code will generally need additional libraries and helpers, which sometimes mess around with the internals of the language. You do not want those added to your final code.
- Test code should rely on your main code, not the other way around.
In short, testing is part of the development process, but it is not part of the finished product itself.
So, how do we do this in Rider?
- Right click on the solution in Rider’s left panel (the thing with a purple pyramid)
- Choose Add > New Project..
- Select “Unit Test Project” in the left panel, in the .NET Core category
- Change the name to whatever you want and make sure:
- NUnit is selected in “Type”
- C# is selected in Language
- Click on “Create”
Now that we have our project, we’re still not done: we have to tell .NET that our unit test project needs stuff from the project we want to test (i.e. we need to add a reference to our main project from our test project). By default, projects are “isolated” from one another, and cannot use each other’s functions. References explicitly tell “hey, I need to use stuff from X”.
- Right click on the test project
- Choose Add > Add Reference…
- Tick all of the boxes of the projects you want to test
Test functions and classes
Rider will generate an example of a test class for you. You can remove it, we’ll create our own tests.
Tests are organized into “categories”. In C#, this is just which class they are in. Let’s say we want to test our “add” function: we could create something like this (in a new file in our test project):
using NUnit.Framework; // Imports everything we need for testing our code

namespace MyTests
{
    // This class will be instantiated automatically by NUnit
    // You can see this as a "category" of tests
    public class TestAdd
    {
        [Test]
        public void TestAddPositive()
        {
            // ...
        }

        [Test]
        public void TestAddMixed()
        {
            // ...
        }

        [Test]
        public void TestAddNegative()
        {
            // ...
        }
    }
}
Each method in our class that is marked with the [Test] attribute is a test.
We can now code our tests. Let’s take the first one, TestAddPositive. The idea here is to add two positive numbers, and see what happens. In order to do this, we’ll need assertions.
You can also have subcategories using nested classes. You can get a neat hierarchy with this.
Assertions
An assertion is a check made against some value. This corresponds to the “I should get” part of tests. If an assertion fails, the test will be marked as failed, and you will have details on what the difference was between what we got vs what we expected.
In NUnit, you get two kinds of assertions…
Classic Model
The Classic Model is the older and is the simplest to use. To assert things, use Assert.XXX(something) (except Assert.That which corresponds to the Constraint Model explained below), for example:
Assert.AreEqual(expected, actual)asserts thatactualis equal to the value we expected inexpected. The order of the arguments matter, make sure the expected value is first, otherwise the error messages you will get will not make sense.Assert.IsTrue(something)asserts thatsomethingis true.Assert.IsFalse(something)asserts thatsomethingis false.Assert.IsNull(something)asserts thatsomethingis null.Assert.IsNotNull(something)asserts thatsomethingis not null.
Constraint Model
The Constraint Model, is the newer model and allows for more expressive assertions, at the cost of a steeper learning curve. Assert.That(...) and constraints are used. While basic equalities are longer to write, more complex checks are much easier to make. Here are some examples:
Assert.That(actual, Is.EqualTo(expected))asserts thatactualis equal toexpected.Assert.That(actual, Is.True)asserts thatactualis true. You can replaceIs.TruewithIs.Falseto get the opposite or withIs.Nullto check for nullity.Assert.That(actual, Is.Not.Null)asserts thatactualis not null.Assert.That(someList, Is.All.GreaterThan(0))asserts that all of the items insomeListare strictly greater than zero.Assert.That(someList, Has.Some.InstanceOf<string>())asserts thatsomeListcontains at least one string.Assert.That(actual, Is.GreaterThan(2).And.LowerThan(3))asserts thatactualis strictly greater than 2 and strictly lower than 3.
Example
Here is what our tests could look like using the constraint model.
public class TestAdd
{
    [Test]
    public void TestAddPositive()
    {
        Assert.That(MyAdder.Add(124, 447), Is.EqualTo(571));
    }

    [Test]
    public void TestAddMixed()
    {
        Assert.That(MyAdder.Add(-124, 571), Is.EqualTo(447));
    }

    [Test]
    public void TestAddNegative()
    {
        Assert.That(MyAdder.Add(-100, -51), Is.EqualTo(-151));
    }
}
And here are the same tests, using the classic model.
public class TestAdd
{
    [Test]
    public void TestAddPositive()
    {
        Assert.AreEqual(571, MyAdder.Add(124, 447));
    }

    [Test]
    public void TestAddMixed()
    {
        Assert.AreEqual(447, MyAdder.Add(-124, 571));
    }

    [Test]
    public void TestAddNegative()
    {
        Assert.AreEqual(-151, MyAdder.Add(-100, -51));
    }
}
The importance of the numbers 571 and 447 are left as an exercise to the reader.
These tests don’t strictly follow the Assign-Act-Assert model – this is fine, as these are already readable enough as one-liners. You can get away with it for simple cases like this, but more complicated scenarios will make that model more obvious.
[Test]
public void ComplicatedTest()
{
    // Assign
    MyObject obj = MyObject("something", "complicated");
    obj.SetUpSomethingComplicated();

    // Act
    TheResult res = obj.ComputeSomething();

    // Assert
    Assert.That(res, Is./* ... */);
}
An important point: one test per case. This could be one test per edge case, scenario, etc. While having multiple tests in a single test is tempting, it basically turns your test into Main functions: meaningless packs of test. If one of the many tests-in-one fails, you won’t really have any detail on what the issue was unless you go through the logs. It just makes testing useless.
TL;DR, don’t do this:
[Test]
public void MyBigOlTest()
{
    Assert.That(Add(1, 2), Is.EqualTo(3));
    Assert.That(Add(1, -2), Is.EqualTo(-1));
    Assert.That(Add(-1, 2), Is.EqualTo(1));
}
Running tests
In order to run your tests in Rider:
- Go to the Unit Tests Explorer. There should be a button for it at the bottom of Rider.
- Make sure you select the explorer and not a previous test run in the tabs
- Either:
- Click on the double green arrow to run all tests
- Select tests or categories and click on the single green arrow to launch those tests specifically
- Right click on tests or categories and run them from the context menu
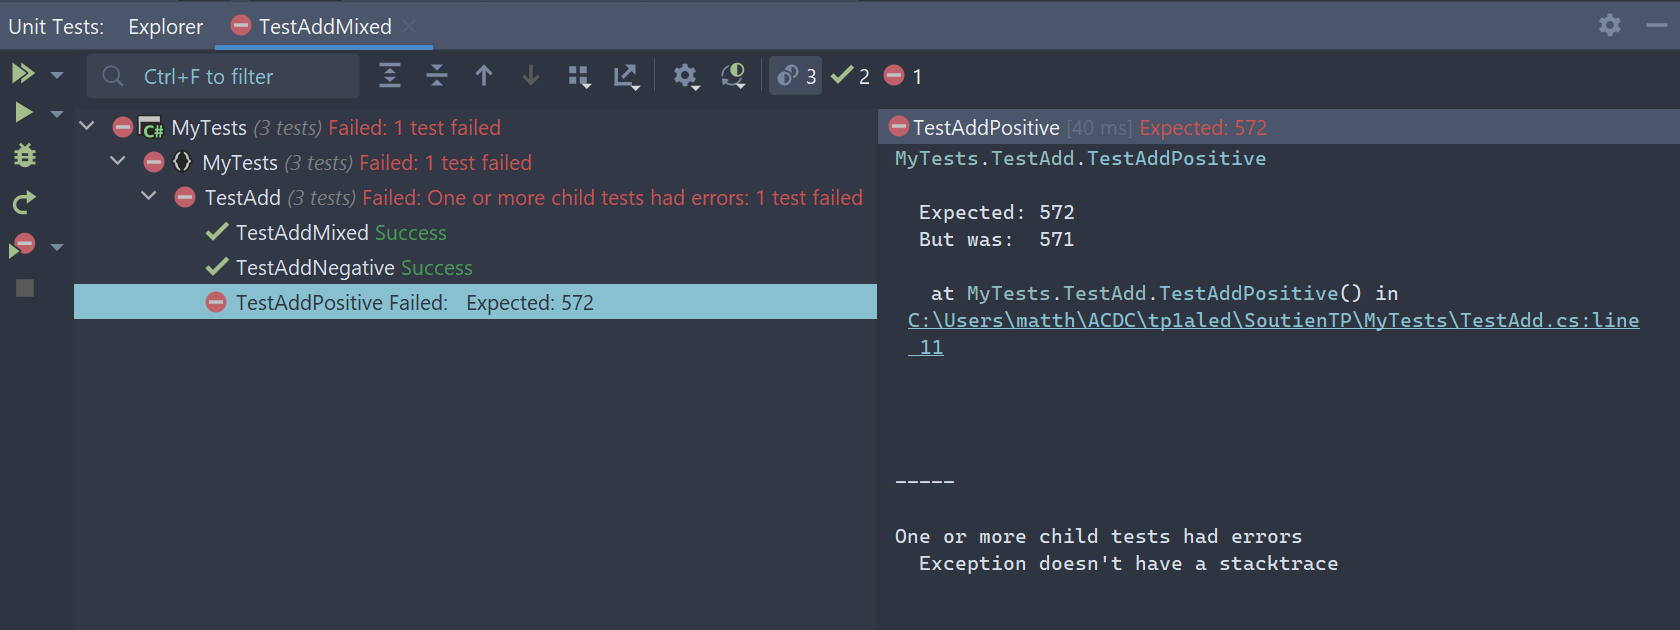
Upon failure, NUnit tells you what went wrong. In this case, I just mistyped the test, and the “expected” value ended up being wrong.
Testing input and output
Automating standard input, output and error output is kind of boring, so here is some code you can add to your test files to easily test C# code that writes stuff to and reads things from the console.
In all cases, this code is based on the fact that you can replace stdin/out/err by your own streams, allowing us to capture the output. This code then sets the standard stream back to its original form, so that it does not accidentally capture things from other tests.
This extract only shows the stdout version, see here for all of the variants.
/// This class redirects Console.Out so that it can be tested against. Usage:
///
/// <code>
/// using var output = new ConsoleOutput();
/// // Something that prints stuff...
/// output.GetOutput(); // Returns what was printed
/// </code>
///
/// Source: https://stackoverflow.com/a/13397075
public class ConsoleOutput : IDisposable
{
    private readonly StringWriter _stringWriter;
    private readonly TextWriter _originalOutput;

    public ConsoleOutput()
    {
        _stringWriter = new StringWriter();
        _originalOutput = Console.Out;
        Console.SetOut(_stringWriter);
    }

    public string GetOutput()
    {
        return _stringWriter.ToString();
    }

    public void Dispose()
    {
        Console.SetOut(_originalOutput);
        _stringWriter.Dispose();
    }
}
Here is an example of a test for a function that prints Hello World.
public class TestHelloWorld
{
    [Test]
    public void TestHelloWorldOutput()
    {
        using var output = new ConsoleOutput();

        Basics.HelloWorld();

        // OPTION 1: With the constraint model
        Assert.That(output.GetOutput(), Is.EqualTo("Hello World!" + Environment.NewLine));

        // OPTION 2: With the classic model
        Assert.AreEqual(output.GetOutput(), "Hello World!" + Environment.NewLine);
    }
}
Exceptions
While you could manually use a try/catch structure and make assertions accordingly, there is an easier way to assert that an exception was thrown.
In order to do this, we’ll need to use a C# feature you have not used before: lambda expressions.
Lambda expressions
Remember functions passed as parameters? The whole Func<...> and Action<...> stuff?
You can pass functions as parameters. Here’s an example of a function that calls the function you give it, then prints the result to the standard output.
public string HelloWorldGenerator()
{
    return "Hello World!";
}

public void Printer(Func<string> stringGenerator)
{
    Console.WriteLine(stringGenerator());
}

Printer(HelloWorldGenerator); // Prints 'Hello World!'
Func<...>represents functions that take n arguments and return the last type argument. For exampleFunc<int, float, string>represents functions that take an integer and a float number as parameters, and return a string.Action<...>represents functions that take n arguments but return void. For exampleAction<int, float>represents functions that take an integer and a float as parameters.
Instead of passing it a function, you can directly put code where you would normally put the function name. Here is the syntax for this, in the Printer example above:
Printer(() => { return "Hello World!" });
Just put the code within the curly braces. There is a lot more you can do with this. In fact, if your code consists solely of a { return ...; }, you can directly put the ... without the curly braces, like so:
Printer(() => "Hello World!");
Pretty cool huh?
Why use lambdas?
You may be wondering why we need that feature, as we have not used it at all so far. Think about the code we would write without lambda expressions:
private void Crashes()
{
    throw new ArgumentException();
}

[Test]
public void SomeTest()
{
    Assert.Throws<ArgumentException>(Crashes());
}
The problem here is that Crashes will directly throw an exception before Assert.Throws is called, since arguments are computed before going into the function. This means that, without lambda expressions, we would have to catch the exception ourself.
If instead of directly call Crashes, we wrap it inside a lambda expressions, we let NUnit handle that code and do whatever it wants with it. We are passing what we want to do, and NUnit will catch exceptions accordingly. Here is what that code looks like:
private void Crashes()
{
    throw new ArgumentException();
}

[Test]
public void SomeTest()
{
    Assert.Throws<ArgumentException>(() => { Crashes() });
}
Assertions for exceptions
A note before we start: there are many ways of asserting exceptions, mainly because we are relying on a specific type being thrown instead of just a value. There is a problem to this: you do not know how to retrieve types. In order to make this code easier to understand, I will be using simple generics instead.
Once again, the classic model is less expressive but easier to use. In order to assert that some code will throw the exception T, use:
Assert.Throws<T>(() => { /* the code */ });
If you want to assert extra things on T (such as the exception’s message), note that Throws returns the exception that was thrown! We could do, for example:
private void Crashy()
{
    throw new ArgumentException("Oh nor!");
}

[Test]
public void TestThrows()
{
    var exception = Assert.Throws<ArgumentException>(() => { Crashy(); });
    Assert.AreEqual("Oh nor!", exception.Message);
}
As for the constraint model, remember when I said that it was more expressive? We’ll see one of its many superpowers in this case.
The simplest check for exceptions is just:
Assert.That(() => { /* the code */ }, Throws.???);
??? can be a few different things:
- The name of the exception. NUnit supports built-in exceptions here, namely
ExceptionTargetInvocationExceptionArgumentExceptionArgumentNullExceptionInvalidOperationException.
TypeOf<T>()whereTis the exception we are interested in.
You may notice that That returns void, meaning we can’t do the same check in the way we did with the classic model. Here’s how you rewrite the previous example using the constraint model:
private void Crashy()
{
    throw new ArgumentException("Oh nor!");
}

[Test]
public void TestThrows()
{
    Assert.That(() => { Crashy(); }, Throws.ArgumentException.And.Message.EqualTo("Oh nor!"));
}
Pretty cool right?
Constraints or Classic?
At the end of the day, you may be left wondering: should I choose classic or constraints? The answer is: it depends. You can use both, so you might as well use what you think is clear for your use case. If you are still left wondering which one you should choose, this Stack Overflow thread highlights some pros and cons for both.
Going further
As tests are an essential part of a product’s development, they are usually involved in many development processes:
- CI (Continuous Integration), where your code is automatically tested when pushing it.
- CD (Continuous Deployment), where versions of your project are automatically compiled and distributed when your tests pass.
- Code/Test Coverage, where a tool tells you which lines your test code didn’t touch, allowing you to check that a newly added feature is full tested before going into production.
Comments? Questions?
Thanks for reading this! Feel free to ask me on Discord if you notice anything strange. While I won’t do tech support, I’ll be able to fix things I might have screwed up in this article.