
Tiny Git Intro
This is a tiny introduction to Git. This is by no means exhaustive: the goal of this document is to get you up to speed as fast as possible with what Git is and how to do stuff with it. For suggestions, DM me on Discord or something.
This is a work in progress and contains mistakes! This post is maintained on a best-effort “basis”.
Introduction
Got? Gat? Jet? Jit?
What is all of this?
- Git can be seen as a “change manager”. It keeps a history of all of your files in an organized way.
- Git’s history is similar to a timeline.

-
Each point on that timeline represents a sort of “checkpoint”. You can always go back to a previous checkpoint – you’ll find your repository exactly as you left it back then.
- These points are actually called commits. Commits contain a bunch of information, including its author, the date at which it was made and a message describing it.
-
A Git repository is, in a nutshell, a folder in which Git tracks changes. This will generally be a project folder, etc.
In more boring terms:
Git is a distributed version-control system for tracking changes in any set of files, originally designed for coordinating work among programmers cooperating on source code during software development. Its goals include speed, data integrity, and support for distributed, non-linear workflows.
From the Wikipedia article about Git.
How do I even get a repository?
Simple! You can either:
git initin the directory in which you want to use Gitgit cloneto retrieve an existing repository from somewhere else.
This isn’t an exhaustive list but these will be the main ways you’ll get a repository.
Knowing what’s up
Status
An absolutely crucial command you need to know is git status. This command gives you a short overview of what the heck is going on in your repository.
When first starting, your repository can be in two situations:
- It already has a commit
- It is empty (no commits yet)
If your repository is empty, Git will tell you about it:
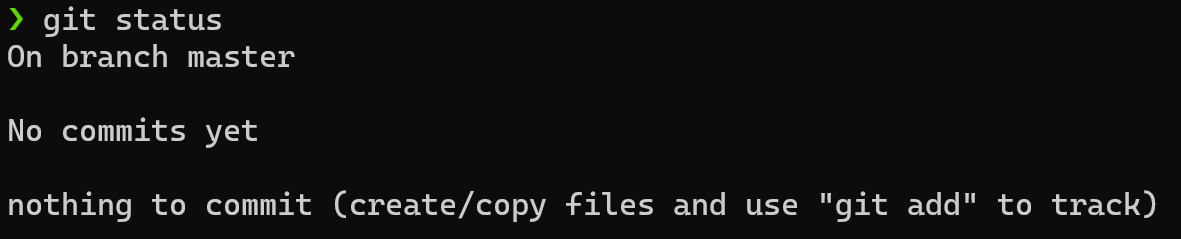
No commits yet
The output of the git status depends on the status of your repository, and will often contain the commands you need to run if you want to do something.
Log
The git log command creates a representation of what the history of all the commits in your repository1. Here’s an example of what it can look like on the EpiLink repository:
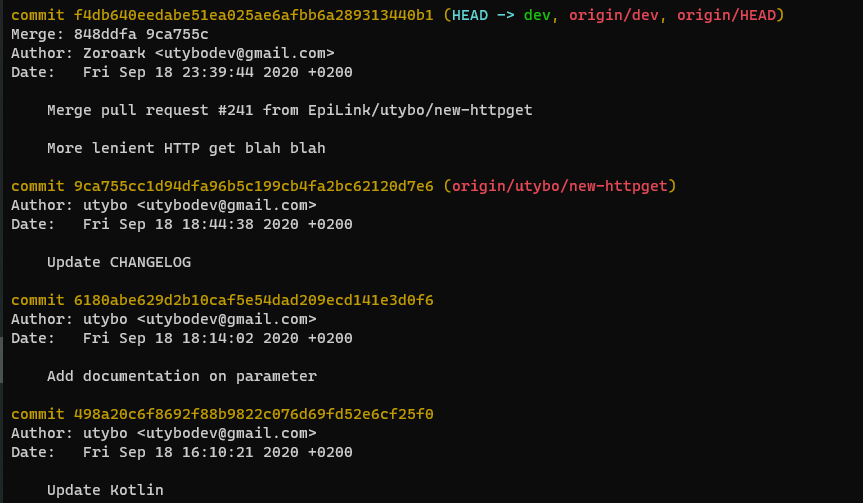
Each commit is displayed with its author, date, message and sometimes additional information (things like branches and merge information which you can ignore if you do not know what they mean).
You can also have a graph representation of your commits. While on simple repositories this will be somewhat similar to the first illustration of this document, it can get a bit complex for bigger projects. Here’s an example that shows commits in a smaller representation (--one-line) as well as a graph representation (--graph) on the left:
$ git log --graph --oneline
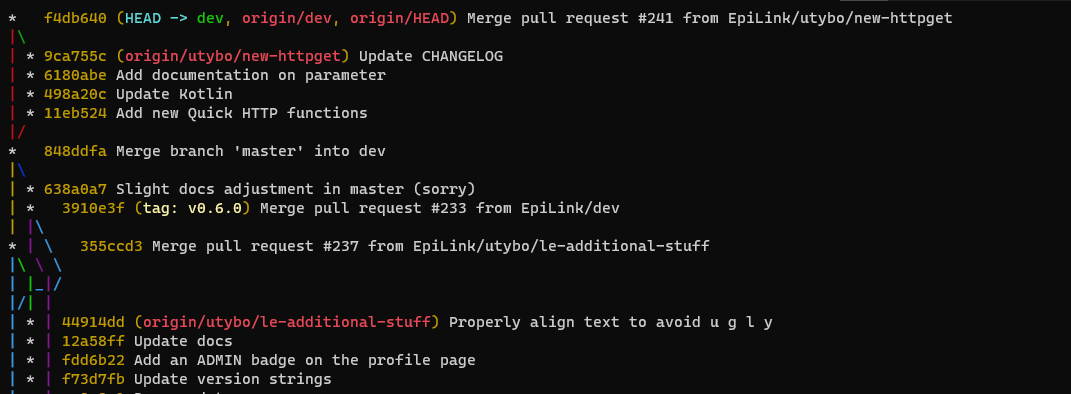
A ton of other options are also available.
Commits
Alright, I’ve already told you about the “change manager” side of things. Let’s actually change some stuff!
Commits are the “atom of change”, the checkpoints on our timeline. Let’s see how we can make some.
Add
Let’s say we create a file.
$ echo "Hello World!" > myfile.txt    # Writes "Hello World!" to myfile.txt
$ git status
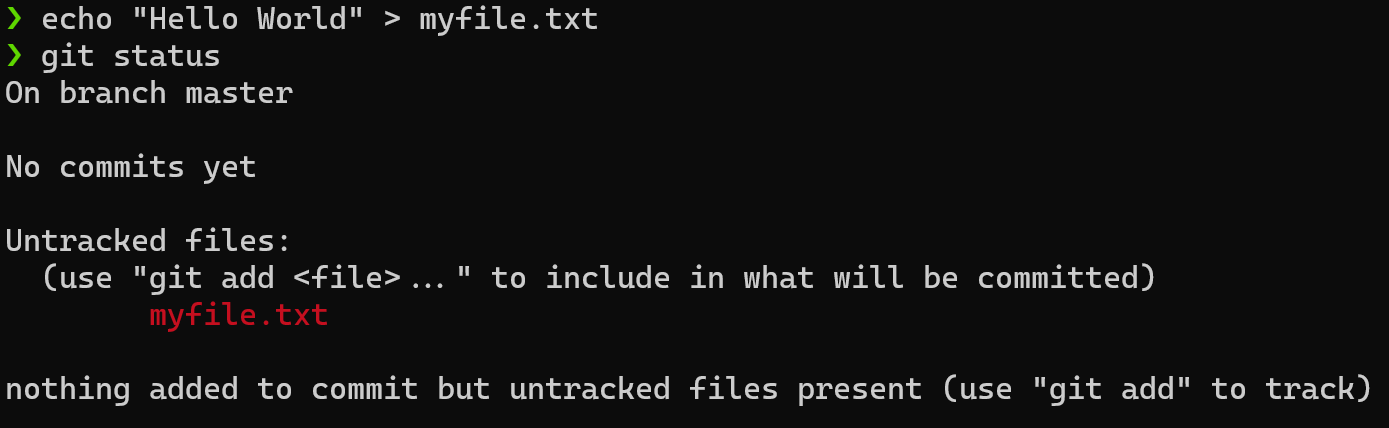
We can see that Git detected our new file.
“Untracked files” here simply means files that Git has never been told about before.
Let’s tell Git to track this file. The git add command is used to tell Git “hey, include this change in my next commit”
$ git add myfile.txt
$ git status
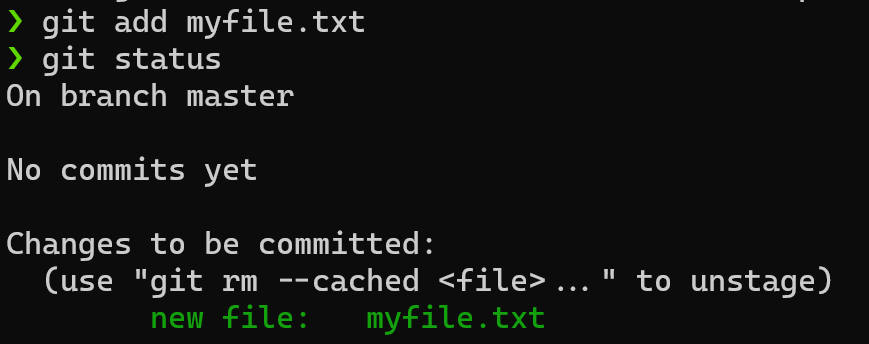
Git now tells us that our new file will be included in our next commit, sweet!
Commit
Making commits can be done using the git commit command, like this:
$ git commit -m "Added myfile.txt"
$ git status
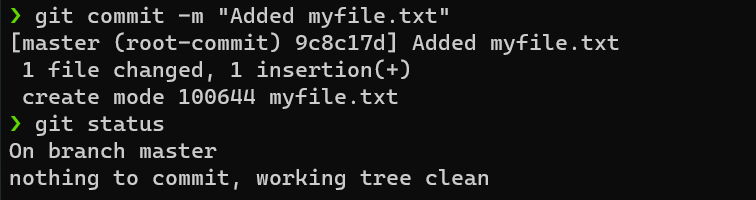
We just created a commit with the message Added myfile.txt, a checkpoint on the timeline. We will always be able to go back to that checkpoint, neat!
You can sometimes get an error where Git does not know who you are. Git needs some information to know what to put as the “author” of the commit.
Simply run the following commands:
$ git config --global user.name "Your Name"
$ git config --global user.email "[email protected]"
Of course, you need to replace “Your Name” and “[email protected]” by your name and e-mail address respectively. git config is the command for modifying the Git configuration, --global tells Git that we want these settings to be used for all repositories. You can also have per-repository configurations, but this is outside of the scope of this introduction.
Remotes
Let’s talk about working with remotes.
A remote is, in a nutshell, “somewhere else where you want to synchronize your repository”. Okay, that wasn’t a super helpful definition…
The why and the what
When working on a projet, especially with other people, you will probably want to “upload” your project somewhere, both for saving it and sharing it with other people. You will also want to retrieve changes other people have uploaded. How can we do that with Git?
Git has a built-in way of dealing with this sort of problem, called “remotes”. Remotes are “other places” where your repository lives. Git can push changes to them (i.e. send new information) and pull changes from them (i.e. receive new information). Remotes can be anything, from a file on your own computer to a faraway server.
In order to talk to a remote repository, Git needs to know the protocol for talking to it (how to talk to the server) and the address (“where” the server is and where should we look for the repository on the remote). Git actually automatically determines with protocol to use based on the address you give it.
For example, here are the URLs for the EpiLink repository:
- Using the HTTPS protocol:
https://github.com/EpiLink/EpiLink.git - Using the SSH protocol:
[email protected]:EpiLink/EpiLink.git
Working with remotes
Adding a remote
If you cloned your repository (i.e. you used git clone), Git already used the remote when you first “downloaded” your repository, you don’t need to do anything specific.
If you initialized your repository using git init, you will need to add the remote yourself:
$ git remote add origin the_url_here
Replace the_url_here by your remote’s URL. origin is the default name for a remote.
You can actually have multiple remotes for your repository, which is very useful if you want to store it in multiple places. Configuring and using Git like this is outside of the scope of this document, but feel free to have a look at the official documentation for more information.
Synchronizing changes
To send your commits to the remote, use the following command:
git push
To retrieve commits from the remote
git pull
The syntax of these commands is actually:
$ git push remote branch
$ git pull remote branch
Where remote is the remote you want to push to/pull from and branch is the branch you want to push/pull.
This syntax is quite useful for multi-remotes and multi-branches repositories which are outside of the scope of this document.
/dev/random
This section contains general tips on using Git.
.gitignore
The .gitignore file contains, on each line, a path or file name that Git should not add nor commit.
Let’s say your repo looks like this
$ tree
my-project
├── Makefile
├── exec.out
├── bin
│   ├── a.out
│   └── main.o
├── doc
│   └── README.md
└── src
    └── main.c

3 directories, 5 files
Say we want to ignore all files that end with a .out and everything that’s in the bin folder.
We can create a file .gitignore at the root of our repositories (next to our Makefile) and put this inside of it:
*.out
bin
That way, Git will never2 git add those files. You can check that this actually worked by running git status. The ignored files shouldn’t appear there, even if they are technically “new” to Git.
Conflicts
What are conflicts?
Much like life, Git is full of conflic– wait no, wrong line.
Conflicts can happen for a number of reasons. When in a conflict state (usually indicated by Git telling you “fix conflicts” at some point), use git status to understand what Git is complaining about.
Oh no!
Conflicts can happen when Git tries to “fuse” (i.e. merge) two paths. An example is when you “pull” from a remote: Git will fuse the local branch (your local copy of the repository3) with the remote branch (the copy of the repository on the remote3). If you happen to change a file on your local repository in a commit while the remote repository also has a commit that modifies the same file, i.e.
                       ...
                        |
        locally ------>/ \<------ on the remote
                      /   \
   modified file.txt *     * modified file.txt but differently
                     |     |
                     v     v
                        ?
How can we “merge” those two “branches”4 when both modified file.txt in different ways? We can’t! And this is why Git has a “conflict” here. Each branch has a different idea of how file.txt, and, when merging, Git asks you “what is file.txt supposed to be after all this?”.
Solving conflicts
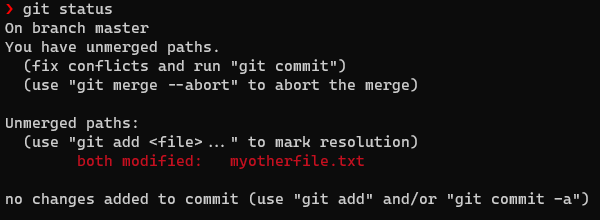
When we run git status in a conflicting state, Git tells us which files have conflicts (here myotherfile.txt). Let’s see that file’s contents…
hello there

<<<<<< HEAD
general kenobaa
=======
general kenobi
>>>>>> fix-general-name
Whoa, what’s all this ? Git actually modified the file telling you what the conflicting versions are. HEAD and fix-general-name tell you where those versions come from. Here, HEAD corresponds to the current state of the repository and fix-general-name to the branch that Git tried to “put into” HEAD.
You need to delete the lines that Git added to indicate you what is what and only keep what you really want in your file. So, we can fix our file like this…
hello there

general kenobi
And tell Git that we’re done with that file:
$ git add myotherfile.txt
$ git status
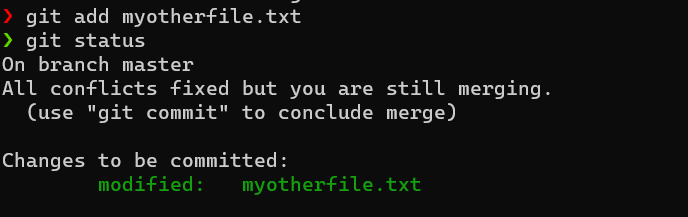
Nice, we fixed the conflicts! We can now tell Git to go ahead and finish what it was doing it before conflicts happen using git commit5…
$ git commit
This will open a text editor, which you can just exit (Ctrl+X for GNU nano, :wq then press Enter for vim, Ctrl+X C for GNU Emacs).
-
Technically, not really. This is a history of the repository up to where you are. This doesn’t make any difference in the scope of this intro, as we’re always working on the latest commit in
master/main. To get a complete view, add the--allflag. ↩︎ -
There are ways to add a file that is in a .gitignore file, but we won’t go into that. ↩︎
-
This is an approximation! This is not what actually happens! Pulling doesn’t merge the whole repository, only the current branch, but since we only have one branch in our repository (and just two copies of it, one locally and one on the remote), this is coincidentally the samething as ““““merging the two copies of the repository””””. ↩︎ ↩︎
-
We are actually really merging two branches in the Git sense (we are merging the branch
masterandorigin/master, which is the branchmasteras the remote namedoriginknows it) ↩︎ -
The command for concluding what you were doing before a merge happened may be different, always check what’s going on with
git status. ↩︎